Understanding AWS IAM Roles for Kubernetes ServiceAccounts
Intro
Modern cloud and microservice based applications often reside in Kubernetes, running on cloud infrastructure such as AWS’ EKS. Such applications commonly harness additional cloud resources and services such as S3, RDS, SQS, etc.; in order to do so in a secure manner (preserving the least privilege security principle) one must only grant access (for said cloud resources) to the appropriate microservices (i.e. their pods).
Both Kubernetes and AWS have their permission management systems - RBAC and IAM (respectively), which are both well tailored for access management within their own realms. However, the above case demands both, since our principal microservice is a Kubernetes resource (such as a Deployment), whilst the resource to be accessed is on AWS (such as an S3 Bucket or SQS queue).
In this post we will explore and understand how to utilize both Kubernetes’ RBAC and AWS’ IAM permission management systems in such cases, forming a hybridized solution called IAM Roles for ServiceAccounts (IRSA).
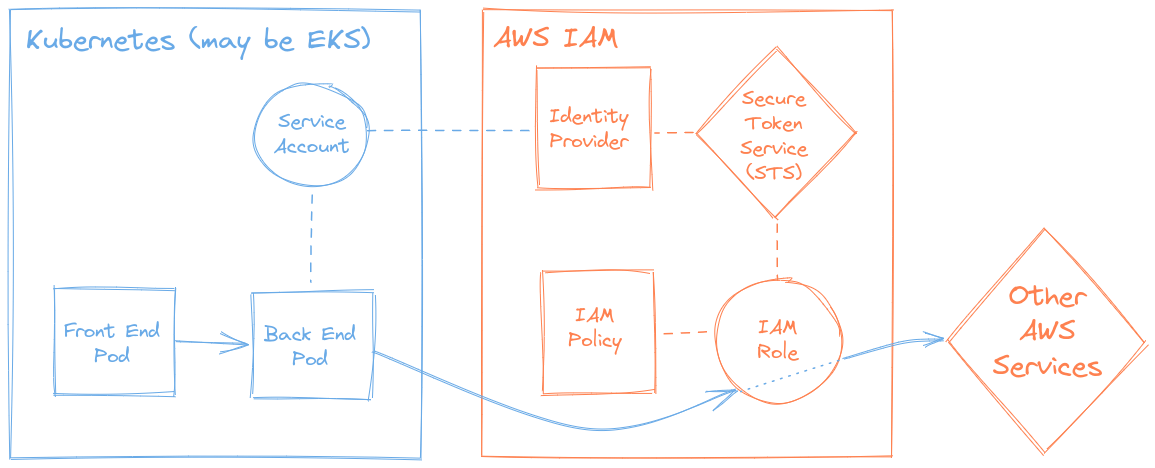
The concept of IRSA
The solution to our case requires bridging between both permissions systems in two places:
In Kubernetes the ServiceAccount (which provides an identity for processes runinng in Pods) must be appropriately annotated with the Amazon resource name (ARN) of the IAM Role to be associated with it. Thus when a Pod assigned with this ServiceAccount makes a request to assume an IAM Role, then its secret token is also transmitted. This token contains a payload specifying the ServiceAccount’s name and namespace, along with other various metadata and is signed by the Kubernetes API Server. One can consider this as the method of authentication (proving ones identity).
In the AWS IAM service we create an Identity provider, which must be configured with the Kubernetes API Server’s thumbprint. Thus when a request to assume an IAM Role is received, then it can be validated since the token is signed by a trusted body (the Kubernetes API Server). This forms a trust relationship between the two systems, allowing AWS IAM to authorize (approve) the role assumption request.
This closes a circle between Kubernetes and AWS.
Practical implementation guide
For this guide we will assume a workload (Pods, Deployment...) running in an AWS EKS Kubernetes cluster requires access to certain AWS resources...
Note: If you deployed Kuberenetes manually then you will need to enable the OpenID Connect (OIDC) plugin for your Kubernetes API Server.
In AWS
Get the cluster’s OIDC provider URL. In EKS it can be found in the web console under the cluster’s Details tab (or it can be retrieved via the AWS CLI with the command:
aws eks describe-cluster --name $YOUR_CLUSTER --output text --query "cluster.identity.oidc.issuer").The value should look similar to this (with a different Id at the end):
https://oidc.eks.eu-west-2.amazonaws.com/id/0524940DCDEE3C59B6B1ABEFCE8BB2A2Create an IAM Identity provider of type OpenID Connect, place the value from the previous stage in the Provider URL field and set the Audience to
sts.amazonaws.com.Click Get thumbprint and then click Add provider (at the bottom).
Note:
If using Terraform with the official EKS module, then just set the module’s input variable
enable_irsa = true.If using Terraform without the module, then add:
data "tls_certificate" "cluster" {
  url = aws_eks_cluster.your_cluster.identity[0].oidc[0].issuer
}
resource "aws_iam_openid_connect_provider" "this" {
  client_id_list  = ["sts.amazonaws.com"]
  thumbprint_list = [data.tls_certificate.cluster.certificates.0.sha1_fingerprint]
  url             = aws_eks_cluster.your_cluster.identity[0].oidc[0].issuer
}
Create an IAM Role with a trusted entity of type Web identity (instead of the default AWS service type), under Identity provider select the Identity provider we created in the previous stage and under Audience select -once again-
sts.amazonaws.com.After this any required AWS IAM Policies can be attached normally to the IAM Role.
In Kubernetes
Create a Kubernetes ServiceAccount, and annotate it with the ARN of the IAM Role from the previous stage:
apiVersion: v1
kind: ServiceAccount
metadata:
  name: can-do-stuff-on-aws
  namespace: testing
  annotations:
    eks.amazonaws.com/role-arn: arn:aws:iam::YOUR_ACCOUNT_NUMBER:role/can-do-stuff-on-aws
Notes:
- The ServiceAccount name [
metadata.name] doesn’t have to be the same as the IAM Role name [metadata.annotations.eks....] (but it can help remembering). - No Kubernetes Role is bound to the ServiceAccount!
- The ServiceAccount name [
Assign the ServiceAccount to a Pod (or workload, such as a Deployment):
apiVersion: v1
kind: Pod
metadata:
  name: my-app
  namespace: testing
spec:
  serviceAccountName: can-do-stuff-on-aws
  containers:
  - name: my-app
    image: nginx:alpine
Once these resources have all been provisioned in the cluster and cloud, any application running in a Pod assigned with the ServiceAccount will have the AWS access rights defined in the IAM policies attached to the IAM Role!
Deep-dive: Examining the trust relationship
Let’s take a closer look at all the components at play and see exactly how the circle of trust is achieved and how they fit together.
The Assume role policy
Once the IAM Role exists, then under its Trust relationships tab, clicking on Edit trust relationship will show its Assume role policy (not to be confused with IAM policy!).
It should look similar to this:
{
  "Version": "2012-10-17"
  "Statement": [
    {
      "Effect": "Allow"
      "Principal": {
        "Federated": "arn:aws:iam::YOUR_ACCOUNT_NUMBER:oidc-provider/oidc.eks.eu-west-2.amazonaws.com/id/0524940DCDEE3C59B6B1ABEFCE8BB2A2"
      }
      "Action": "sts:AssumeRoleWithWebIdentity"
      "Condition": {
        "StringEquals": {
          "oidc.eks.eu-west-2.amazonaws.com/id/0524940DCDEE3C59B6B1ABEFCE8BB2A2:sub": "system:serviceaccount:testing:can-do-stuff-on-aws"
        }
      }
    }
  ]
}
What this policy enforces is that this IAM Role can only be
assumed via the AWS’ Secure Token Service when
requested by a Web Identity [see "Action"] - specifically
our OIDC Identity provider [see "Principal"], and
- most importantly - only under the condition that the token’s payload
string references the authorized subject (“sub”) - i.e. the
Kubernetes ServiceAccount [see
"StringEquals", under "Condition"].
The ServiceAccount
When a Kubernetes ServiceAccount is created, it automatically has a
special Kubernetes Secret (of type
kubernetes.io/service-account-token) created for it; it can
be seen referenced under Mountable secrets when the
ServiceAccount is described:
kubectl -n testing describe serviceaccount can-do-stuff-on-awsWhich returns:
Name:                can-do-stuff-on-aws
Namespace:           testing
Labels:              <none>
Annotations:         eks.amazonaws.com/role-arn: arn:aws:iam::YOUR_ACCOUNT_NUMBER:role/can-do-stuff-on-aws
Image pull secrets:  <none>
Mountable secrets:   can-do-stuff-on-aws-token-5r5xg
Tokens:              can-do-stuff-on-aws-token-5r5xg
Events:              <none>
Note: Your secret’s name will have a different random suffix than my
-5r5xg.
The Secret
If we describe the Kubernetes Secret itself, by running:
kubectl -n testing describe secret can-do-stuff-on-aws-token-5r5xgIt returns:
Name:         can-do-stuff-on-aws-token-5r5xg
Namespace:    testing
Labels:       <none>
Annotations:  kubernetes.io/service-account.name: can-do-stuff-on-aws
              kubernetes.io/service-account.uid: 59cf0215-e56c-4534-a889-3c8a6c1ada3d

Type:  kubernetes.io/service-account-token

Data
====
ca.crt:     1066 bytes
namespace:  7 bytes
token:      eyJhbGciOiJSUzI1NiIsImtpZCI6IjJvNTQwbDBodFpWMUlqX2ktOEZPQ1NJaWZuMENESTZPam53MzVmZUxoR1UifQ.eyJpc3MiOiJrdWJlcm5ldGVzL3NlcnZpY2VhY2NvdW50Iiwia3ViZXJuZXRlcy5pby9zZXJ2aWNlYWNjb3VudC9uYW1lc3BhY2UiOiJ0ZXN0aW5nIiwia3ViZXJuZXRlcy5pby9zZXJ2aWNlYWNjb3VudC9zZWNyZXQubmFtZSI6ImNhbi1kby1zdHVmZi1vbi1hd3MtdG9rZW4tNXI1eGciLCJrdWJlcm5ldGVzLmlvL3NlcnZpY2VhY2NvdW50L3NlcnZpY2UtYWNjb3VudC5uYW1lIjoiY2FuLWRvLXN0dWZmLW9uLWF3cyIsImt1YmVybmV0ZXMuaW8vc2VydmljZWFjY291bnQvc2VydmljZS1hY2NvdW50LnVpZCI6IjU5Y2YwMjE1LWU1NmMtNDUzNC1hODg5LTNjOGE2YzFhZGEzZCIsInN1YiI6InN5c3RlbTpzZXJ2aWNlYWNjb3VudDp0ZXN0aW5nOmNhbi1kby1zdHVmZi1vbi1hd3MifQ.Pyf4jdNNQnIH3NO2x2RIrSuecRXlzAFV3c9Ed4kK4OV2sI49RJRQI_A3rEDh-QanKJBdt0BY98G_30QWokmCfwuMbJunb7o2qUKHu4qHkcYYUgxFpGFMNZnMFmZ1hOqSOWX7b6pcfGJtH40nvw7U4FSsKAkON3lI5eQmu2e5hSIgqJgHhNhFmSpRCxdbBSBOOPcHeONQQLuKZ2ogHA6DZ1udJYjIaDMFiSiCngjwAJCccK3r75W5-DQ8jXv5J8peW-UnLNz8A3dUzc9kbzVzg2-_Uc698cnkDjH1yuE7KS8OWSqjqogIN1spuhcc7J6qmO9iBDZGsOcgzyrBiet7TQ
Then under Data we can find the actual token.
The Token
Kubernetes ServiceAccounts’ secret tokens use a standard format called JSON Web Token (JWT) (which is not native to Kubernetes).
Using a
JWT
debugger to decode it, one can see it’s composed of three parts
(each separately base64 encoded) - a HEADER,
PAYLOAD and VERIFY SIGNATURE - which are
concatenated with periods.
The part that is of most interest is the PAYLOAD, which
most importantly contains the "sub" (subject) field:
{
  "iss": "kubernetes/serviceaccount",
  "kubernetes.io/serviceaccount/namespace": "testing",
  "kubernetes.io/serviceaccount/secret.name": "can-do-stuff-on-aws-token-5r5xg",
  "kubernetes.io/serviceaccount/service-account.name": "can-do-stuff-on-aws",
  "kubernetes.io/serviceaccount/service-account.uid": "59cf0215-e56c-4534-a889-3c8a6c1ada3d",
  "sub": "system:serviceaccount:testing:can-do-stuff-on-aws"
}
Note: The
"sub"field’s value exactly matches the"StringEquals"condition from the Assume role polcy examined earlier.
Conclusion
In this post we learned about the problem which IRSA offers to solve, whilst understanding the requirements of a trust relationship between the AWS and Kubernetes permissions management systems, and we went over all the steps (across both platforms) to implementing the solution.
Following that, we went under the hood to examine the components of the Assume role policy that every IAM Role has, and - finally - explored JWT tokens which are used by Kubernetes ServiceAccounts, seeing what their Payload contains and how they relate to IAM Roles’ Assume role policy.
Sources & additional info
- AWS documentation for IRSA
- JWT official introduction
- Kubernetes documentation - Authenticating to the Kubernetes API server